Please note:

PLEASE NOTE: All student work featured on this blog is my intellectual property. If you wish to reference or use any work displayed here, kindly ensure proper credit is given. For any reproduction or use on your website, blog, or social media, please seek explicit permission from me at missfeeda@artandfeeda.net. Thank you for your understanding and cooperation.

Blog information

BLOG INFORMATION: To access the BLOG ARCHIVE, please navigate to the right-hand side of your screen and scroll down to find it. When using the archive, be mindful of the references/resources organized by year. For the year 2020 onwards, you'll find references that are exclusively related to the new syllabus of 0400. These resources are invaluable for staying up-to-date with the latest curriculum and materials. For the years 2019 and those prior, you can still make use of the content for its work quality, innovative ideas, and sources of inspiration. These older references can be especially helpful for crafting ideas and guidelines to support your Component 2 ESA (new syllabus) endeavors.

Contact me at

Email: missfeeda@artandfeeda.net
Instagram: @artandfeeda


Please click the link below for the Updated: Art & Design IGCSE 0400 syllabus 2025-2026


Tuesday, October 18, 2016

PART #2 :: How to do your preparation work for Art & Design IGCSE 0400 - Paper 2 : Design Assignment

Hello art educators/teachers/students,

Continuing from the previous post, please click here -> PART 1  to know about the Design Paper with Reannes' work. 


In this post, I am going to attach Yi Ruth design preparation work and the final piece for your reference.

For our mock exam, Yi Ruth chose question number 8. She needs to develop a design based on the paper aeroplane she made. 


A few round of discussion with her and she ended up doing an accessory as the product. 

Remember (!) 
Design paper is all about what is your product you would like to produce, based on the subject matter(s) given/stated in the question requirement. 

Let us go through all Yi Ruths' preparation work and the final piece.

(click the picture for a better view)

From the prep one you can see the introduction, the subject matter studies, the design samples taking place and presented well in her piece. She also arranges the work in a nice composition and annotates each of the processes. Not only that, but she is also doing some minor mixed media with the grid paper over there. That goes to the experiment and exploration assessment criteria for IGCSE. Very well done!

(click the picture for a better view)

All the work above were painted by Yi Ruth. She did details with watercolour, pencil, pen and some adding with Chinese ink. At this development, you could see, she is trying to plan for a collection of accessories for woman. She limits her colouring choices - which is a smart choice! Her design product looks elegant and exclusive. 

(click the picture for a better view)

Referring to the prep three above, she breaks them into a technical drawing when she just focused only on the structures of the product. To make her work looks interesting, some of the drawings, she draws on the grid papers. That is giving the aesthetic value on her prep three pieces. I love to see how she improvised the designs by putting the product on the models. Models were painted by her using the mixed media technique. A well controlled mixed media indeed!

(click the picture for a better view)

Prep 4 is always, 2 or 3 outcomes (product) that you might choose for your final piece. Yi Ruth smartly arranged her focus ideas into only 2 and by focusing limited colours and close-up some part of the body and angles, giving the high impact in this piece. I love the attitude of experimenting with the media and also the object and at the same time, emphasising Composition in it. Liking the vibes of elegant elements in it as well. Brilliant!

(click the picture for a better view)

Finally, for the Final Piece, look at how Yi Ruth presents the whole thing in A2 size! Crazily amazing isn't it? By using only the white, black range of colours and focusing only gold tone for the product, the results turn out super amazing! She is only 16 years old and her quality of work beyond I could imagine! I graded her Design paper A*!


_____________________________________

To be continued. 
(with Tian Huey design work)


DO LET ME KNOW IF THE SHARING HELP YOU IN ANYWAY!
WOULD LIKE TO HEAR FROM YOU.

YOU CAN FEEDBACK AT COMMENT BOX OR EMAIL ME AT msfeeda@yahoo.com

Monday, October 17, 2016

PART #1 :: How to do your preparation work for Art & Design IGCSE 0400 - Paper 2 : Design Assignment

Hello art educators/teachers/students,

I am back to brief you about Design Paper, Art & Design IGCSE 0400 with some samples from my students.

_____


Please take note that our school are taking Art & Design IGCSE 0400 for November Series.

For our mock exam, I will use the June Series exam questions to prepare my students for the upcoming exams.


Above questions were taken from June Series 2016 Examination 


Referring to the questions above, I worked with my students on selecting the best question for them to do for the mock exam. 

Please take note (!)
  • Design question requires you to choose what type of product you want to work with and to 'present' from your idea development progress and towards your final piece.
  • You have to use your FIRST-HAND STUDIES when it stated in the question requirement and always encourage your students to expand the research, gathered their pictures, snap the photos, printed out as preparation work references.
  • The truth about the whole set of preparation works and the final piece, 

    I 'DESIGN' MY LAYOUT AND ALL THE SEQUENCES ARE NOT COMING FROM THE CIE OR IGCSE, as a teacher, I think what is the best to meet what the question wants and guide my students towards the aim of each question. 

    As far as my experiences goes, my layout of helping them shows results. Good results. All the results, at the end of the day, based on each of the student ability and capability in presenting their preparation works and final piece.

    I do a lot of analysis too. Will talk about how to do analysis in next post. 
_____

I am going to use Reanne, Tian Huey and Yi Ruth art samples to explain further about the progress.

Reanne chose question number 4 and spent the time to expand her research about the healthy eating and food. Her idea, at the end of the progress, she is preparing a campaign poster as what the question wants - Grow Cook Eat. 


(click the picture for a better view)


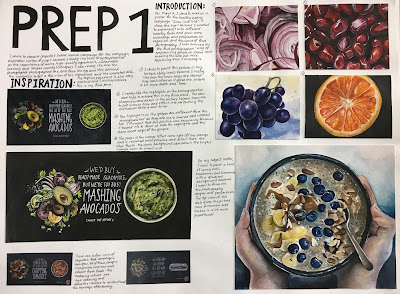
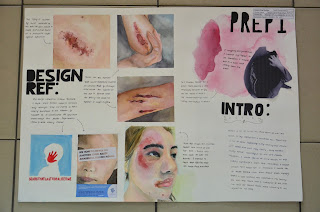
In this prep 1, I always emphasise the important of introduction and the students should write in brief why the choose the question, what is the aim of the whole preparation work and what is their expectation at the end of the final piece. The students will attach some research material in the form of designer's work that inspired them to do the design or any product (as for above - poster) that given them some interesting idea to work with their ideas later on. 

(click the picture for a better view)


These are the details of the First-Hand Studies materials and the drawing/painting of the subject matters ( I think ) should show in first preparation work. LOVE the outcomes by her. 

(click the picture for a better view)


Above shows the close-up of a poster sample, taken from the internet that giving Reanne the inspiration for her upcoming idea development. She used a variety of media to do details on it. E.g, water colour, gel pen, pencil, etc. 

Reminder (!)
Annotation is still important in Design paper as well. Encourage your students to annotate all the process/progress/decision/selection - basically, journal the progress. 


(click the picture for a better view)


Going back to Reanne's Prep 2 - For a poster or front cover book or any printed product, I will encourage my students to study about the font types, the layout templates. From this prep, you can see that Reanne came out with the different type of fonts as well as putting some background and pattern to some of the fonts. She managed to arrange well with the font studies, templates and some studies with the images in it. It is supposed to be a 'technical' studies. 


(click the picture for a better view)


(click the picture for a better view)


For the preparation 3 and 4, the students need to combine all the elements they did in prep 1 and 2. The students need to combine the font studies + layout + in co-operate with the subject matter (first -hand studies) 

You can see, the design paper is very direct and focus. At this prep 3 and 4, encourage your students to re-arrange the idea and emphasise the idea development with an interesting composition, proportion and colour choices. In between the process, we as a teacher, we have to give some design input/knowledge/exposure to help them to learn how to improvise idea from the research and the subject matters.  

(click the picture for a better view)


Reanne's final piece ( 8 hours controlled-test )


_____________________________________

To be continued. 
(with Yi Ruth and Tian Huey design work)


DO LET ME KNOW IF THE SHARING HELP YOU IN ANYWAY!
WOULD LIKE TO HEAR FROM YOU.

YOU CAN FEEDBACK AT COMMENT BOX OR EMAIL ME AT msfeeda@yahoo.com


Thursday, October 13, 2016

Amazing art website found!

To all art educators,

Go to THE ART OF EDUCATION


You will find a lot of amazing resources, tips and information about arts and art education!


Sunday, October 9, 2016

How to start your preparation work for Art and Design IGCSE 0400 Paper 1?

Hello, everybody!

Based on my experience in guiding my students for Art and Design IGCSE 0400, I am going to share with you the steps for your preparation work to the final piece (the 8hours controlled test).

( You can read 'About me' at the side of my blog if you wonder who am I! :) 

SO HERE WE GO! HOW I GUIDE MY STUDENTS

The guidelines are for Paper 1: Broad-Based Assignment

I am going to use my student's mock exam work that meet the A* requirement in IGCSE (I think so-based on my analysis). Her name is Reanne Koh, and she's a skilful art student indeed. You can follow her Instagram at reannekoh 

Based on the question given, Reanne wanna do the question number 6 which is 'Old rope and a weathered piece of wood'.

As I discussed with Reanne, I did a lot of brainstorms with her. How she wants to choose the rope, set up the rope and how she'll gathered the wood to ensure it looks like a weathered piece of wood. 

Remember (!) You have to choose the question you can VENTURE with you skills, techniques and with the subject matter, you can experiment and do a lot of exploration throughout your progress. 

According to Reanne, she bought her subject matters from the hardware store nearby her house.

These are the pictures, complication of research pictures Reanne did, and she shared all the research pictures with me through discussion at school and also send me some of them through the 'wassap' (phone) for further clarification. 

Remember (!) First Hand Studies is very IMPORTANT in Art & Design IGCSE. Below are Reannes' research pictures she set up at home and tried out different angles and views for variety and experiment purposes. 


Remember (!) Students can choose any question as long as you know that the question will benefit their progress and match their skills in art. The most important is, you have to guide your students to get their subject matter(s) and snap the pictures (can do it in school or at home). From the complication of the photos, keep on discuss with them what photo shows the best angles, lighting, composition and so on so forth. Always encourage the students to do reflection and decide what's best to use for the preparation work. 

Here is the preparation work of Reanne from prep piece number 1 to piece number 4. I will write the process and the feedback for each of them. 

(click the picture for a better view)

For preparation number 1, I always encourage my students to write in brief why they choose the question, why they choose what they choose. Also, I will ask them to find one reference artist, preferably from local artist, however, they can choose any artist (or artist's work) to refer to. The reason behind the selected artist (and the work) have to state in brief. Why they choose what they choose. They may say they like the technique; they want to try out the new technique, the technique looks similar to their subject matter. Any reason that links to their question or subject matter or the direction in work.  

The students can experiment and explore any media at Prep #1. The media can be from dry media, wet media or mixed media. From time to time, I will show a demonstration of mixed media, concentrating on the surface experiment. For Reanne, she did a lot of mixed media as early as in prep #1, which is fine. 

(click the picture for a better view)

As you see here, Reanne didn't put all her studies in a box. I don't encourage that. I want them to think how to re-arrange the layout. Make it interesting and presentable. The students should explore more on composition, proportion and look at the progress as overall. She recorded (annotate) her progress well for each process, experiments and exploration. For the prep #2, she still continues with a mixed media style (fine art style) but scopes in depth at the black and white studies. That's a brilliant choice of studies if you ask me!

(click the picture for a better view)

For the prep #3, Reanne tried to do a small 'close up' on the texture, as well as using the black surface to see the outcome with dried media on it. She also tried to experiment with the lighting at the ropes, focusing on the ropes studies with some mixture of light lines (see right on the top outcome). A lot of details and experiment happens in this prep. For each prep, I will give my feedback which area/part need improvement in techniques and placing. 

(click the picture for a better view)


You could see the separation of surface studies above by Reanne and below two with intensive details of the ropes and the wood at the back. A lot of media manipulations and studies. You can see the detail and the texture. I think, by exploring in depth with media, you can gain marks in idea development and specifically under techniques development. 

(click the picture for a better view)
FINAL PIECE


That was Reanne's final piece. She took 8 hours (4 hours in day 1 and another 4 hours in day 2) to complete the work. It was a fantastic piece. The size was A2 size on watercolour paper. She used watercolour papers for prep work as well. I gave her A* for her mock exam. The mark gave based on my analysis of the previous results. 

Additional tips:
Do feedback to your students work
Do observe your students work
Do demonstration on a new technique. Avoid showing a lot of YouTube tutorial
Involves your students during demonstration
Continue to listen to their idea and keep on discuss with them where to improve
Enjoy guiding them, and mostly, YOU WORK WITH THEM INDIVIDUALLY. BASED ON THEIR SKILLS because YOU CAN'T GENERALIZE YOUR EXPECTATION AS A WHOLE. EACH OF THEM ARE DIFFERENT IN THEIR WAYS. 

Do let me know if this sharing helps in any way.

Thank you! :D


Sunday, September 4, 2016

Annotation in Art

Dear all, 

Here some guideline I took from  the different notes I found from google.
You can guide your students based on the info below and guide them to use art term / art key words.


Sunday, June 19, 2016

Year 10 Second Term

Paper 2 questions


  1. Cover page of Health Magazine for August 2016 issue
  2. Cover page of a novel that features ‘lemon’ as a front cover. You need to come out with the type of novel, title, and description
  3. A collection of fashion design inspired by lemons
  4. Mural wall design inspired by lemons at a café in your town
  5. Furniture design inspired by lemons to be placed in a hotel lobby


Please bring the first-hand studies research materials by Thursday, 23 June
Thank you

Sunday, April 24, 2016

Frida Kahlo


WHO IS FRIDA KAHLO?


Google and get inspired by Frida Kahlo's artwork and herself!


Monday, April 18, 2016

A star THIRD BATCH collection 2015 - VERY PROUD OF THEM - Paper 2

Paper 2
by Amanda W.


Paper 2
by Siew G.L


Paper 2
by Emily T.


Paper 2
by Esther C.


A star and Top Scorer in Msia
(ALSO HIGHEST MARK IN PAPER 2)
by Shermaine L.